How do I set viewing permissions on my Mediasite presentation?
Submit a Media Capture support request in the LCSEE Systems Service Center.
Permissions, not to be confused with Visibility, allows you to grant various levels of access to your Mediasite assets.
To change who can view your presentation, first open your presentation from MyMediasite. Below you'll find instructions for Basic Security, using the slider, and Granular Security with settings in the Edit Security button.
Basic Security
In the screenshot below circled in RED, note the WHO CAN VIEW? slider and set it based on the list below:
Everyone: Anyone with the “Quick Link” share URL can view this presentation
My Organization: Anyone with a WVU Login
Only Shared Users:
eCampus: If you link to a presentation in your eCampus course, Only Shared Users will include the students that are enrolled in that course. They will only be able to view that presentation by clicking the link to the presentation in eCampus.
WVU Logins: Specific users with WVU Logins that you list via Edit Security Settings (see the section below, Granular Security) or those that you have invited by email that registers with the Mediasite server.
Only Me: Just your account can view
Learn more from the Mediasite U page and video for Adjusting Security For Sharing.
The SECURITY button gives more granular access to view and perform other functions on the presentation.
For example, you have a presentation in which you only want a select group of people with WVU Logins to view, you can add them on a per person basis.
Granular Security - Specific WVU Login Users
The person(s) to whom you wish to grant specific access must be known to the MyMediasite system:
Make sure the person has logged-on to the MyMediasite Portal with their WVU Login username and password.
If prompted, they should complete the registration and validate their account. Students should use their MiX email address for registration. Faculty and Staff should use their Outlook email address for registration.
These steps populate the information needed to add them to access lists in the following steps.
Given a scenario in which you want to limit access to very specific individuals, you can define that list using the steps below:
Choose a presentation and choose Edit Details from the upper right.
Click Save
Under WHO CAN VIEW? set the slide to Only Shared Users.
Under SECURITY click Edit Security.
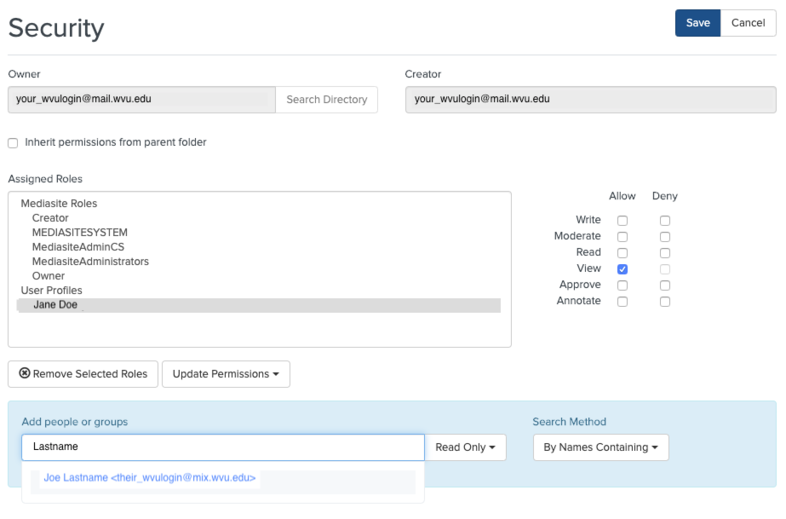
Verify that the box next to Inherit permissions from parent folder is unchecked.
Under the section Add people or groups, change the Search Method to By Names Containing.
Type the last name of the person you're looking to add. You will see a list of people matching that last name.
Choose the specific person from the search results by verifying their email address.
Once they appear in the Assigned Roles box under User Profiles, chose their name.
Make sure the View checkbox is checked in the Allow column.
Make sure the Read checkbox is unchecked in the Allow column.
Click Save
These settings will allow you to use the Share Presentation button and the Quick Link to allow those, added per the above steps, with the Quick Link to view the presentations.
Below is a screenshot the summarizes the settings you should see in you Edit Security window.